|
ECS Photoshop Tutorial
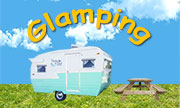
"My Resort!"
|
|
| These video tutorials match the skills taught in the classroom. Each segment below corresponds to the gradesheet provided to the students. |
| Reminder: How to Right Click on a Macintosh... (video) |
| Explanation of this Photoshop training...(Mobile) (YouTube) |
Create a folder on your desktop. Title it: “MyResort_Photoshop” (Mobile) (YouTube)
|
Step #2: Acquire Images
- Go online to Google Images, find and save to your folder an image of a trailer, a bench, a sky and grass. (The online tutorial will show you how to access the actual images in the graphic above) (Mobile) (YouTube)
|
Step #3: Create A Canvas
-
Open Photoshop. Create a New Canvas. Set the canvas to 5 inches wide by 3 inches high / 72 dpi / RGB / transparent. Save this Photoshop project to the folder you created on the desktop. Title it: “Glamping_YourName.” (Mobile) (YouTube)
[If you are using a version of Photoshop pre 2021, then use: (Mobile) (YouTube) ]
|
Step #4: Import & Resize An Image and The Lasso Selection Tool.
- Import the four images to the canvas and remove the trailer background by using the Polygonal Lasso. (Mobile) (YouTube)
|
Step #5: Layers: Arrange and Appear
- Arrange the layers and make them appear and disappear. (Mobile) (YouTube)
|
Step #6: The Magic Wand Selection Tool & Transfor
- Remove the white background around the bench and change the size of the bench. (Mobile) (YouTube)
|
| Step #7: Adding Text
|
Step #8: Drop Shadow
- Add a Drop Shadow to each of the layers in this image. (Mobile) (YouTube)
|
Step #9: Trim (or Crop) Canvas
- The canvas must be reduced (Trim or Crop!) to match the size of the image. (Mobile) (YouTube)
|
Finally: How To Compress & Export An Image
- After you create the image in Photoshop, you must compress it and export it so that it can be used by other applications: (Mobile) (YouTube)
|