Create A Basic Website
Purpose: Students will build their first website that will consist of two pages, images, formatted texts and links. Note: Students are provided with the code.
View The Model Site: This is what you are going to rebuild - ModelSite
View The Model Handout: This handout provides 1. A visual of the Model Site, 2. The code for each page, and 3. The File/Folder structure. - Model Handout
Step#1: Create The File and Folder Structure
View the Model Handout. Scroll to the bottom of the document to the image of the File and Folder structure for the website you are about to create. Now, recreate the folder structure exactly as it is shown in the image. Note: Create a folder and name it "SvModelBasic". Create two additional Folders inside the "SvModelBasic" folder . Title one of these folders "Documents" and title the second folder "Graphics."
Video Tutorial #1: Creating the Files & Folders for My First Website. (You Tube)
Video Tutorial #2: Your Code and File & Folder System Must Match! (You Tube).
Step#2: Create the .HTML Pages
Create two new ".html" pages using Notepad...just like you did when you created, "My First Web Page." Look at the code provided for each of the two pages provided below to see what these two new pages should be called:
SF Code
World Map Code
These two .html files go in the "Documents" folder.
Step #3: Get the Graphics
Here are the two images that you should save to the "Graphics" Folder: "SF" & "WorldMap" (Right click..."Save Image As.")
Step #4: Write The Code and Test In A Browser
Then type the provided code on one of the blank .html pages - Save it! - Then open it in a browser to test if it functions correctly. Any time you make a change to the code...Always
"Save" the code and "Refresh" the browser. the web page is functioning correctly when the text and image appear on the page and the link connects you to the second blank page. If it doesn't function correctly, begin analyzing what the problem may be and make the necessary changes.
When you get one of the web pages to function correctly, copy the code from the first page and paste it to the second .html page. Now make the necessary changes to the text on the page so that it now matches the other web pages file & folder structure. You will need to change the name of the image and the file so the link will function correctly. Save and Refresh the browser. If it doesn't function correctly, begin analyzing what the problem may be and make the necessary changes.
Hint: It is easiest to build the pages if you keep four Windows open at all times: 1. Notepad "SF", 2. Notepad "WorldMap", 3. Browser of either page, and 4. This web page so that you can always follow the instructions. By doing this, you will be able to make a quick change to the code on the page, then Save, then click Refresh on the Browser Window and see it it functions correctly.
Extensions!
But Mr. Harrington...My Link & Image on 'My First Website" Won't Work...
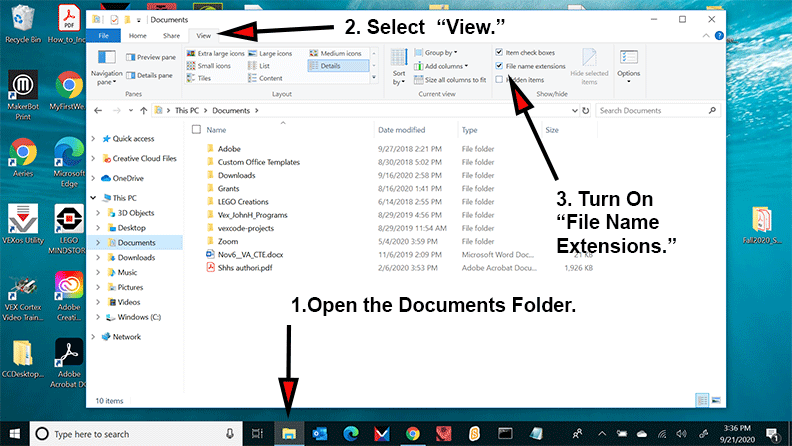
I was working with one of your classmates and this student was not able to get their links or images to appear on their 'San Francisco" or 'World Geography" web pages. I looked at the code and it appeared to be correct. Then I noticed that the computer he was using had the extensions turned off. That means that "SanFrancisco.html" appeared as "SanFrancisco" on the file; html is an extension. So the student typed .html onto the file name. In reality, the file now had two extensions: "SanFrancisco.html.html" and this is what the line of code was actually seeing when it was searching for "SanFrancisco.html". This is why the link was always broken. This might be why your images do not appear as well. Solution: just turn the extensions on and this problem should disappear. Below is an image I created of the three steps you need to follow in order to turn on the Extensions on a P.C.